Include your macOS version, BarNest version (Preferences → About), and a brief description of the issue.
Quick Start & Visual Guide
Master BarNest in minutes with these 4 essential operations:
Step 1 · Reveal & Hide Drawer
Hover cursor or press hotkey to unfold
BarNest lives directly in your menu bar. Simply hover your cursor over the nest divider arrow (< or >) to smoothly reveal hidden icons with fluid spring physics. Moving the cursor away collapses the drawer automatically. You can also press the global hotkey ⌥⌘B at any time.
Floating drawer unfolded: Integrated with All, Folded, and Always-Hidden segmented controllerStep 2 · 3-Tier Hierarchy & Shelf Tabs
Seamlessly toggle between All, Folded, and Always-Hidden
Organize apps according to your workflow into three distinct levels: Always Visible (stays on main status bar), Auto Hide / Folded (revealed on hover), and Always Hidden (tucked away into the deep drawer).
All (全部): Aggregates and reveals all sheltered menu bar icons in one single place;
Folded (折叠区): Displays your frequently accessed hidden apps;
Always Hidden (始终隐藏区): Opens the isolated shelf for background daemons and low-frequency utilities, also accessible via ⌥⇧⌘B.
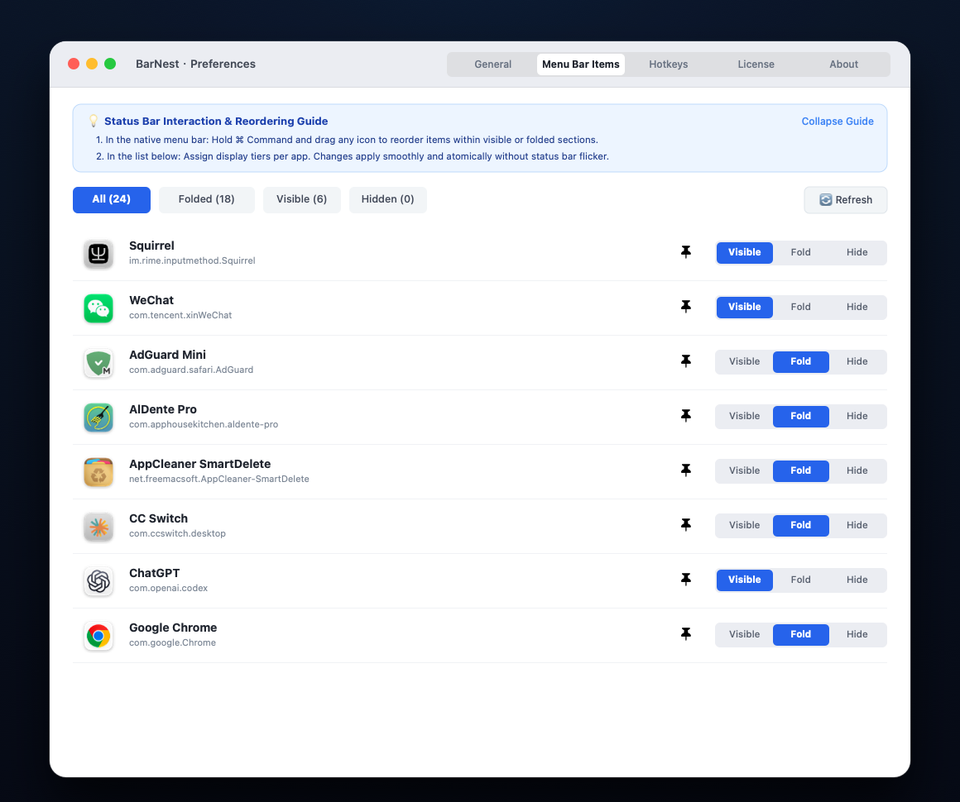
Real shelf tier switching: Tap All (20), Folded (6), or Always Hidden (14) to filter items dynamicallyPreferences Item Management: Assign items to Visible, Fold, or Hide with instant zero-flicker updatesStep 3 · Preferences & Notch Collision Safety
Hover sensitivity, hotkeys, and screen collision safety
Right-click the menu bar divider or click the gear icon ⚙️ at the end of the drawer to open Preferences. Customize hover delays, launch at login, global shortcuts, and let BarNest automatically safeguard icons from getting lost behind MacBook camera notches.
Step 4 · Free Trial & Multi-Mac License
One-time purchase, lifetime access across all your Macs
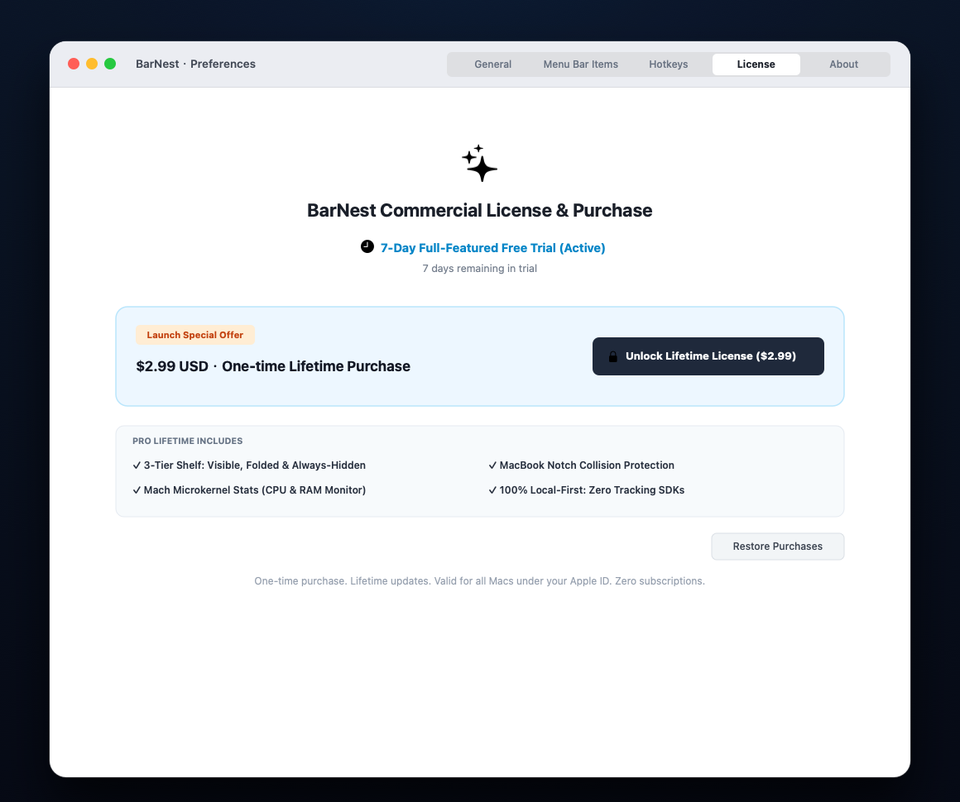
Start a full-featured 14-day trial with the $0 trial in-app purchase in the Mac App Store. The trial does not charge you automatically. Unlock permanent access in Preferences → License. On a new Mac or after reinstalling, click Restore Purchases to restore your purchase under the same Apple ID.
BarNest lives directly in your menu bar. Look for the nest divider icon (< or >) in your status bar. Click it to expand or collapse hidden icons, or right-click to open Settings.
Does BarNest require Accessibility or special system permissions?
No. BarNest is engineered with a strict Zero-Permission architecture. It does not require macOS Accessibility permissions, Screen Recording permissions, or any sensitive system entitlements. It works instantly out of the box in the secure macOS App Sandbox.
How does the 14-day free trial and lifetime license work?
Start a full-featured 14-day trial with the $0 trial in-app purchase in the Mac App Store. The trial does not charge you automatically. Launch price: $2.99; $5.99 from 2026-12-01. One-time purchase; no recurring subscription.
How do I restore my purchase on another Mac?
Open BarNest Preferences → License and click Restore Purchases while signed into the same Apple ID. Purchases are synced across all your Macs.
Wechseln Sie blitzschnell zwischen den verschiedenen Ebenen.
Direkte Umschaltung der 3 Stufen im Drawer
Häufige Fragen
Benötigt BarNest Bedienungshilfen- oder spezielle Systemberechtigungen?
Nein, absolut nicht. BarNest basiert auf einer strikten Zero-Permission-Architektur und benötigt weder Bedienungshilfen noch Bildschirmaufnahmen. Es läuft sofort sicher in der macOS Sandbox.
Wie funktioniert die 14-Tage-Testversion?
Mit dem $0-Test-In-App-Kauf im Mac App Store können Sie alle Funktionen 14 Tage testen. Es erfolgt keine automatische Abbuchung. Einführungspreis $2.99; ab 2026-12-01 $5.99. Einmalkauf, kein laufendes Abonnement.
Support & Guide d'utilisation BarNest
Organisateur de barre de menus pour Mac. Compatible avec macOS 12.0 ou ultérieur.
Survolez la flèche (< ou >) ou appuyez sur ⌥⌘B pour afficher instantanément vos icônes masquées.
Tiroir flottant : bascule immédiate entre Tous, Replié et Toujours masquéÉtape 2 · Classement en 3 niveaux
Filtrage direct dans le tiroir
Passez d'un niveau à l'autre en un seul clic.
Comparaison en temps réel des 3 niveaux de classement
Questions fréquentes
BarNest nécessite-t-il une autorisation d'accessibilité ou des privilèges système ?
Non, absolument pas. BarNest est conçu selon une architecture stricte zéro autorisation (Zero-Permission). Il ne requiert aucune autorisation d'accessibilité ni d'enregistrement d'écran et fonctionne immédiatement dans le bac à sable macOS.
Essai gratuit de 14 jours et achat à vie
L’achat intégré d’essai à $0 dans le Mac App Store donne accès à toutes les fonctions pendant 14 jours. Aucun débit automatique. Prix de lancement $2.99 ; $5.99 à partir du 2026-12-01. Achat unique, sans abonnement récurrent.
Soporte y Guía de Uso de BarNest
Organizador para la barra de menús de Mac. Compatible con macOS 12.0 o posterior.
Pasa el puntero sobre la flecha (< o >) o pulsa ⌥⌘B para ver los iconos ocultos al instante.
Cajón con selector de 3 niveles: Todos, Plegados y Siempre ocultosPaso 2 · Organización y filtrado en 3 niveles
Cambia de nivel con un solo toque
Filtra instantáneamente los iconos directamente dentro del cajón.
Comparativa real de los 3 niveles dentro del cajón
Preguntas frecuentes
¿Requiere BarNest permisos de accesibilidad o permisos especiales del sistema?
No, en absoluto. BarNest está diseñado con una arquitectura estricta de Cero Permisos (Zero-Permission). No requiere permisos de accesibilidad ni de grabación de pantalla. Opera de inmediato dentro del sandbox seguro de macOS.
Prueba gratuita de 14 días y licencia definitiva
La compra integrada de prueba de $0 en Mac App Store permite probar todas las funciones durante 14 días. No se cobra automáticamente. Precio de lanzamiento $2.99; $5.99 desde 2026-12-01. Compra única, sin suscripción recurrente.
Suporte e Guia do Usuário do BarNest
Organizador de barra de menus para Mac. Compatível com macOS 12.0 ou posterior.
Passe o mouse sobre a seta (< ou >) ou use ⌥⌘B para abrir instantaneamente a gaveta de ícones.
Gaveta flutuante com seletor de 3 níveis: Todos, Recolhidos e Sempre ocultosPasso 2 · Filtragem em 3 níveis
Alterne entre áreas com um clique
Filtre os ícones na gaveta sem complicações.
Comparação visual dos 3 níveis na gaveta
Perguntas frequentes
O BarNest precisa de permissões de acessibilidade ou permissões especiais do sistema?
Não, absolutamente não. O BarNest foi desenvolvido com uma arquitetura rigorosa de Zero Permissões (Zero-Permission). Não requer permissões de acessibilidade nem de gravação de tela. Funciona imediatamente no sandbox seguro do macOS.
Período de teste de 14 dias e licença vitalícia
A compra de teste de $0 dentro do app na Mac App Store dá acesso completo durante 14 dias. Não há cobrança automática. Preço de lançamento $2.99; $5.99 a partir de 2026-12-01. Compra única, sem assinatura recorrente.